Hip shingles are installed on hip roofs as a weather barrier on the roof edges (hips) between sections of the roof. Ridge caps are the shingles and vents installed across the peaks (ridges) of hip and gable roofs to weatherproof the ridges and ventilate them. Do-it-yourselfers tackling their own roof can benefit from these detailed instructions for making sure the hips and ridges of their roofs are properly installed the first time, saving leaks (and a lot of hassle) later.
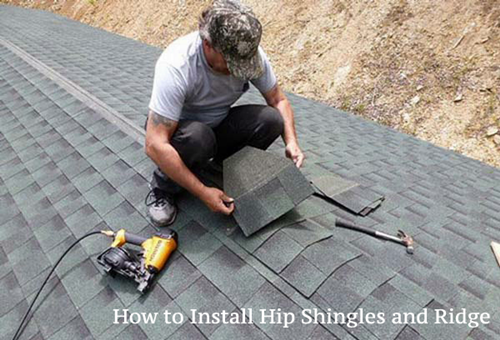
Instructions for Shingling a Hip or Ridge
- On a hip roof, be sure to shingle from bottom up, and cover hips all the way to the top before starting the ridge. Hip shingles should be installed after the entire surface of the roof is shingled.
- Start with half of a hip shingle, cutting off the tab itself. This is a starter shingle, just like the one which goes before the first course of any roofing.
- Install the first shingle tab, cutting off the leading edge, along with that of the starter shingle underneath, flush with the existing roofing. Drive in a nail on each side of the shingle about one inch from the outside edge at the sealant line. Driving the nail through the sealant will help seal the nail hole and prevent possible leaks.
- Snap a line up the hip on the side of the roof most visible from the ground. This line will usually be about 6 inches from the hip edge. Use a hip shingle at the top of the hip to determine exact line placement.
- Install the second course, using the chalk line to line up the edge, and follow manufacturer’s guidelines for exposure. For certain 3-tab shingles, this may typically be somewhere around 5 inches. For other higher-scale hip and ridge shingles, the exposure measurement may be larger. The exposure recommendations can be found on the packaging, and should be followed exactly as suggested to ensure that each shingle gets double-nailed as the hip is covered.
- Work up the hip all the way to the ridge. Ensure total hip coverage by shingling high enough that only the normal exposed portion of the last hip shingle is visible once the ridge shingles are installed.
- To shingle a ridge, determine prevailing wind direction and shingle accordingly so that when finished, the wind will not have the tendency to get under the ridge shingles and tear them loose.
- Follow the same procedure as with the hip shingles for starter shingle usage.
- Snap a line and remember to maintain proper exposure to weather.
- To shingle a vented ridge, work on both ends of the ridge, shingling into the area that will be covered by the ridge vents at least 6 inches on each side to prevent leaks. For example if a ridge is 26 feet long, use 25 feet of ridge vent but use a full shingle on each side so that the actual vent opening is about 24 feet. This will prevent water from getting in along the edge of the ridge during winter weather or heavy rainfall.
- Shingle over the ridge vent the same as any other ridge, starting with a starter shingle and shingling according to prevailing wind direction, and leaving proper exposure with each course. The last shingle installed on a ridge will have exposed nails. Usually this shingle will be a half tab with the top half cut off, and will be nailed into place to cover half of the previous shingle.
- When installing shingles over ridge vent, use 3 inch roofing nails to ensure that the shingles are fastened properly to the roof, and not just nailed into the vents themselves. Many needless repairs can be avoided by putting away the nail gun when installing ridge vent and paying attention to this special step.
- Any exposed nail heads should be caulked when all the hip and ridge shingles have been installed, and any debris cleaned up to prevent shingle material blocking water flow in the gutters.
Additionally, consider reading the best roofing nailer reviews before you buy.


Loves home. I am here to provide how to make your home a much better place. 🙂 Blogging about HomeDecor, Home Improvements and more.