Everything’s eventual. There will come a time when you need to make some upgrades in your home. One of the most common projects installing new flooring. Carpet removal is necessary. It’s time to ditch that wall-to-wall carpet once and for all.
So, getting rid of out-of-date carpet is quite a task. But if you really want to feel that fresh carpet beneath your feet, you have to remove the old shag first.
I honestly didn’t know the first thing about carpet removal. Because I was relentless in my determination, I figured it out. Removing old carpet takes time. It also requires materials, tools, and a bit of effort. So, you better be ready to work your muscles!
In this post, I will go over what tools and materials you will need. Then, we will focus on the easy steps to correctly remove the old carpet. Ready to tackle this project yourself? Keep scrolling.
Materials & Tools for Carpet Removal
- Utility Knife
- Crowbar
- Pliers
- Dust Mask
- Shop Vacuum
- Heavy Work Gloves
- Floor Scraper
- Hammer
6 Easy Steps for Carpet Removal
After you collect all of the necessary supplies, you are ready to begin. Follow the steps below to start shredding old carpet like a pro in no time.
Step 1. Remove Obstacles
First things first. That coffee table in the center of the room has got to be moved out of the space. The same goes for the rest of the furniture too. It would be pretty awkward to try and pull out carpet with your stuff piled on top of it, right? When you’re in the clear, you’ll be able to start. Note: Sometimes carpet is installed under a shoe molding. If you see this, get rid of it with a crowbar. Do your doors swing into the room? If so, take them down. Basically, you just want to clear the way. No need for interruptions or snags as we get down to business.
Step 2. Proceed With Caution
Take a good, look at the carpet. Ten extensive years. Has it really been that long? It definitely hasn’t aged well. I can only imagine the amount of dust and dirt that has accumulated over time. But, I’m willing to bet it’s full of it. To keep from inhaling these particles, a dust mask is necessary. You will also need some protective gloves. Nobody wants to get stabbed in the hand by a rusty old staple. Gloves will keep you from getting poked when handling the tack strips too.
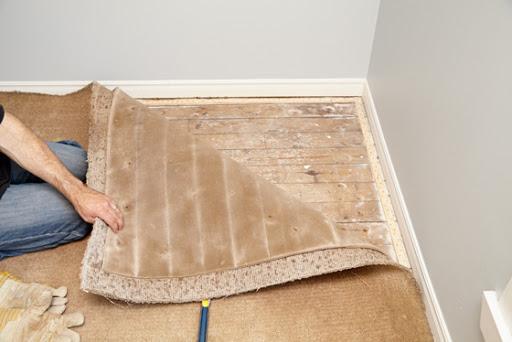
Step 3. Time to Remove the Carpet
Ready to get down to the nitty-gritty? Then, grab your pliers and pick your starting point. Use your pliers to work a corner of the carpet until it loosens. Place your pliers to the side so you can get a hold of the carpet with both hands. Start pulling the carpet back. This process can be tedious. So, try this simple hack: Cut the carpet into strips. Then the carpet will be much easier to carry.
Start by using your upper arm strength to pull back two feet of the carpet. Then, fold it over to expose its backside. With your utility knife in hand, cut through the back of the carpet. Congratulations! You successfully cut your first strip of the carpet! Not too hard, huh? It’s so much easier to cut from the back. Plus, it protects your flooring beneath. You will continue to pull and cut the carpet until it’s completely removed from the floor. Just be sure to take all of the carpet strips out of the room when finished.
Step 4. Get Rid of the Tack Strips
When you see a thin piece of wood that’s studded with nails, you’re looking at a tack strip. Now, I’m sure you didn’t just put in all that hard work to leave the exposed floor looking a hot mess, did you? Your plan of action depends on if you’re installing new carpet or keeping it bare to reveal that linoleum that’s been hidden for years.
You can skip this step if you’re replacing the carpet. But be mindful if they appear damaged or rusted. If so, they need to be replaced. To remove these strips, make sure you wear some protective gloves. Then, grab your crowbar. It’s going to help you pry the tack strips from the floor. I’m not going to lie. The struggle is real. These strips won’t come off the floor in whole strips. It’s going to be in pieces. It takes time and it will put a strain on your back. But once you finish, you can finally breathe a sigh of relief. Pheww!
Step 5. Remove the Carpet Pad
Now it’s time to remove the sheet of foam rubber or spongy material that was covered by the original carpet. It’s called a carpet pad. Start in a corner of the room. Use both hands to pull back the padding. Then, you’re going to do the same thing you did when removing the carpet. Fold the pad over and cut it into strips. Keep in mind that the carpet pad may be glued or stapled to the subfloor. To confront this challenge, grab your floor scraper. It works well in removing stuck-on pieces. Plus, it pulls out staples. Some people use a good pair of pliers to take out the staples. But if you want to save time, just use the floor scraper.
Step 6. Clean Up
It’s official. The old carpet is a thing of the past. Now that you’ve removed all of it, there’s one thing left to do. Clean up the subfloor with a heavy-duty shop vac. Disposal policies for carpet vary. So get ahold of your local sanitation department to find out how to dispose of the old carpet. You may be able to set it out for pick up or drop it off. And there’s a chance that you can lower your impact on the environment if your city has a carpet recycling program.
Final Thoughts
So, that’s it! Are you feeling like you accomplished the unthinkable yet? Carpet removal requires you to work hard. But as long as you follow the steps above, you will be successful. DIY projects aren’t for everyone though. If that’s you, then you may want to invest in carpet removal services. Either way, your floor will gain new life once that dingy, stained carpet is gone.