Whether you are getting ready for a new roofing project or you are preparing for the repair of an existing roof, proper measurement techniques are needed. It is important to ensure that measuring a roof for shingles is done accurately and that the right materials are obtained.
There are several roof measuring methods to select from. In this article, we will examine some roof measuring methods. For assistance in measuring roofs, consider enlisting technological solutions like Roofr for more accurate measurement.
Why is measuring a roof for shingles important?
For every roofing project, preparatory measurements are fundamental. It’s essential since it provides a basis upon which all other project decisions are made. For example, roof measurements dictate the quantity of materials that are required to get the job done.
Knowing the right measuring techniques can preemptively save money, as the impact of inaccurate roof measurement can be costly to fix. Hence, doing it right the first time is crucial.
Techniques for measuring roofs for shingles
There are two main techniques that you can make use of: measuring with Google Earth and measuring from the ground.
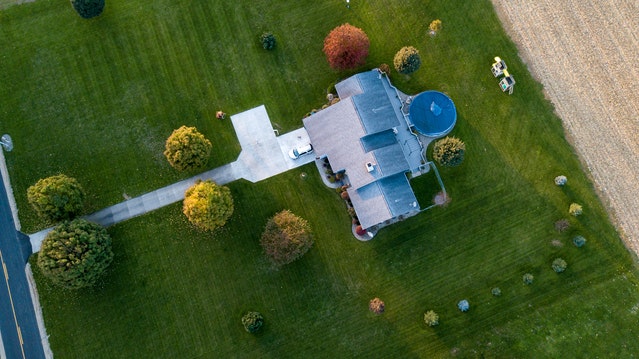
1. Measuring a roof for shingles with Google Earth
Google Earth allows you to measure through satellite. Satellite roof measurement is one of the most efficient techniques used by many today. Google Earth measurement uses a 2D or 3D scanned image to accurately represent the roof pitch, facilitating an easy, swift, and detailed measuring process.
Even when you’re measuring the roof shingles yourself, you can verify the information using Google Earth. Here are the steps you can take to start using this method.
Step 1: Connect to the Google Earth network
Log into Google Earth to view captured areas. This may not include images from remote areas, so progress only if you’re certain your structure will be easily located.
Step 2: Obtain the 3D representation of your building
Check the upper left corner of your computer screen for the search icon. Click on it and insert your house address. The system will load, and you will have a birds-eye, 3D view of your property.
Step 3: Employ the image for measurement
Now that you have the view, click on the image and drag it while holding the shift key on your keyboard to see the building’s roof. Proceed by taking screenshots of the frame and preparing it for printing. You can also copy the view and paste it into a software program like PowerPoint. Once you have the slide or printed image, mark the dimension you want to measure.
Step 4: Start measuring the perimeter
To proceed with measurement, ensure the image is in 3D. This ensures that you have a good view of the roof and prevents inaccurate measurements. Do not change or reduce image quality to 2D. Where it has been changed by Google, remember to set it back to 3D by clicking on the small circle located in the lower right corner.
Check the upper right corner and ensure the measurement metric is in “feet”. Look to the left sidebar and click on the ruler.
Now measure a shape or slope. Click the edge of the roof one after another as you move. Keep clicking on the parameter gradually to close the shape. This will give you the measurement of the parameter and the area.
Step 5: Calculate the measurement for an estimate
Once you’re done with measuring, add all the measured roof areas to get an estimate of the amount of shingles that will be required for roofing.
2. Measuring for roof shingles from the ground
Roof measurement isn’t only possible from a bird’s eye view—it can be done from the ground up as well. While measuring your roof from the top is ideal whenever possible, if you have limited access, you can still use this method to achieve accurate results.
To measure from the ground, you’ll need to estimate your roof pitch and the measurement of the base area. You can then use these two data points to calculate a measurement of your roof.
Here are the steps you need to take.
Step 1: Calculate the roof pitch
You’ll need a notepad, pencil, and tape measure. Find the slope of the roof you want to measure, and proceed by measuring the distance from the outer edge of the eave until you can no longer see the slope of the roof. Record the measurement in inches. This is the horizontal run.
Now measure the roof rise by standing under the edge of the roof plane. First, measure the slope, and then measure the vertical distance from the top edge of the roof overhang.
Calculate the roof pitch by dividing the roof rise figure by the horizontal run figure.
Step 2: Measure the base area
Measure the roof base width by measuring the distance from the edge of one eave to another along the edge of the same wall. This should be recorded in feet.
Then measure the length by getting a measurement of the other side of the building from one edge of the eave to another.
Now use the roof base width, multiplying the roof base length, to measure the total roof base.
Use the roof pitch measurement above and the total roof base to determine an estimate of the roof footage. Use the result (from dividing the roof rise with the horizontal run) to multiply the roof base.
For instance, a roof pitch of 3-in-12 has a 1.031 multiplier. If the total roof base is 2100, the roof footage is 2,165 feet.
Consider both methods for measuring
These two methods for measuring roofs for shingles can be very effective. However, there are certain factors to take into consideration before you think about using them.
For example, using Google Earth to measure a roof is impossible if your house is located in a remote area, since it’s likely that the location will not have been scanned or cached.
On the other hand, measuring roof shingles from the ground is only efficient when working on a gabled roof. For a complex roof, it’s not advisable to use this method, as it may result in high inaccuracy.
It’s important to note that any measurements done inaccurately can be costly, affecting the preparation and execution of the project.