Most image editing tools are built for people who already know what they are doing. The interface assumes familiarity with layers, masks, color spaces, and adjustment curves. If you are a small business owner who wants to freshen up a product photo, or a social media manager who needs a new visual for tomorrow’s post, or a marketer who just wants to see what a different background would look like — you are not the user the software was designed for. You are the user who opens the tool, feels immediately out of their depth, closes it, and waits for someone else to help.
That gap is real, and it costs teams time and autonomy every day.
Why Non-Designers Get Stuck Editing Visuals
The friction is not a skill problem in the deepest sense. Non-designers know what they want a visual to look like. They can describe it clearly in conversation: “I want the product on a clean white background,” or “make this look more like a professional studio shot,” or “change the lighting to something warmer.” The knowledge exists. The gap is between knowing what you want and being able to produce it without design software expertise.
Traditional photo editing asks you to achieve your intent through a series of technical operations: adjustment layers, blend modes, color grading curves. You need to know the path from “I want this warmer” to “raise the temperature slider, pull the highlights, add a slight orange tint to the shadows.” Without that procedural knowledge, you are stuck.
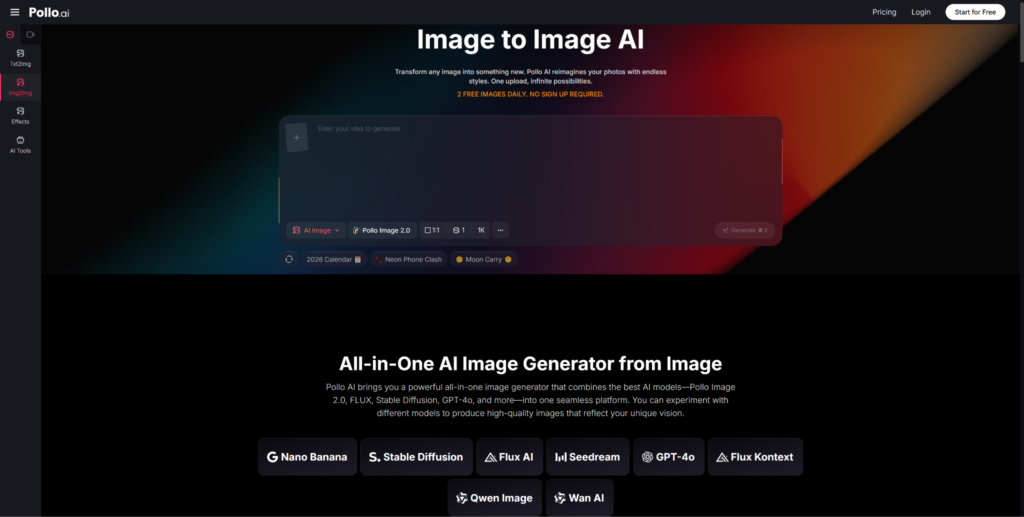
Pollo AI flips that relationship. The Image to Image AI tool from Pollo AI means that instead of translating your intent into technical operations, you describe your intent in plain language and the AI executes the technical steps. The prompt is your brief; the model is the operator. You provide the what; the model handles the how.
The three-step workflow is genuinely accessible: upload your image, select a LoRA if you want a particular style (or skip this step if you just have a text prompt in mind), and type what you want to change. Then click Create. No tutorials required. No layers to manage. No software to install.
What Actually Gets People Stuck: The Prompt Problem
If the workflow is three steps, the honest question is: where do beginners still get stuck? The answer is almost always the prompt.
Writing a good prompt does not require specialized knowledge, but it does require a specific kind of clarity. Most people’s first instinct is to write something vague: “make this look better,” or “improve the background,” or “make it professional.” These produce mediocre results not because the model is poor but because the instruction is under-specified.
Good image-to-image prompts follow a simple structure:
What should stay the same. The model needs to know what to preserve. If you want only the background to change, say so explicitly: “same product, unchanged composition.”
What should change. Be specific. Not “nice background” but “clean white studio background with soft even lighting and no visible shadows.” Not “professional look” but “high-contrast commercial photography style, sharp edges, neutral color palette.”
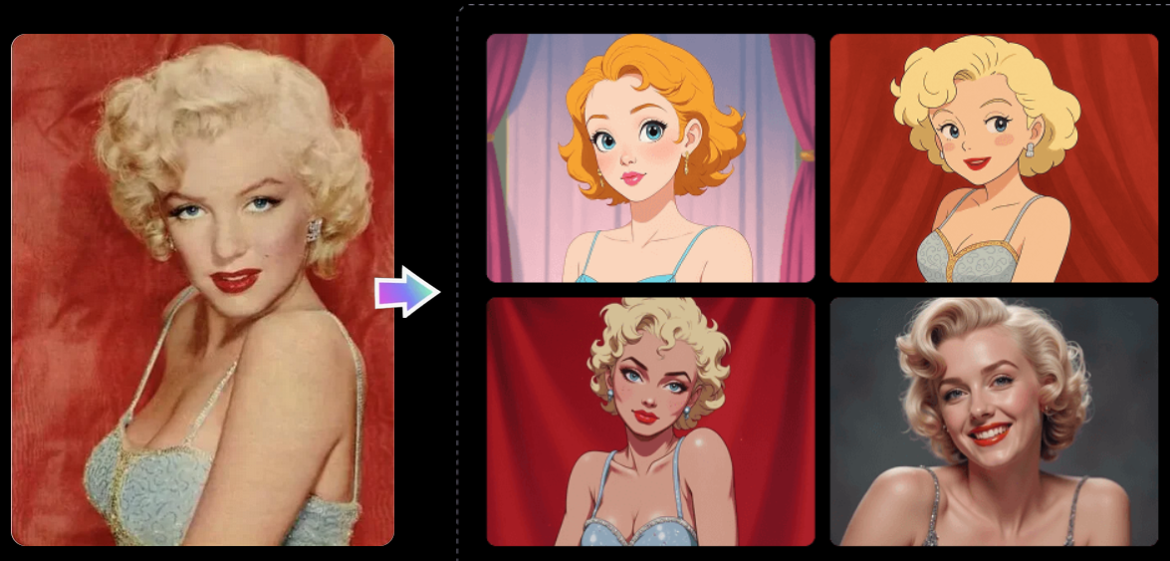
The style or mood, if relevant. If you have a reference aesthetic in mind — editorial, minimalist, lifestyle, cinematic — name it. Many LoRAs correspond to specific visual styles, so selecting one can replace a paragraph of style description.
Think of the prompt as a clear set of directions, not a wish. The more specific you are, the less the model has to guess, and the closer the first output will be to what you actually want.
A Practical Beginner Prompt Template
Here is a starting template non-designers can adapt immediately:
Keep: [describe what must stay unchanged — subject, composition, angle] Change: [describe what should be different — background, lighting, color, style, environment] Style: [optional — name a visual style or mood, e.g., “clean commercial photography,” “warm editorial lifestyle”]
An example using this template:
Keep: the product (leather wallet) in the center, same angle and perspective Change: background to a dark slate surface with soft ambient lighting Style: premium lifestyle photography, slightly moody
That prompt is not long. It is not technical. It is specific in the ways that matter.
When to Switch Models or Use a LoRA More Effectively
The platform offers multiple models — including Pollo Image 2.0, FLUX, Stable Diffusion, and GPT-4o — and more than 2,000 LoRAs. For a non-designer, the range can feel overwhelming. Here is a simple frame for thinking about it:
Start with the default model. The default option is well-calibrated for general use. You will get solid results from it without knowing anything about the underlying differences between models.
Try a different model when the results feel stylistically off. If your output looks too flat, too cartoonish, or too hyperrealistic for what you need, try a different model. Each one has a different rendering character. Experimenting does not cost much — the free plan lets you try the platform before committing.
Use LoRAs when you have a style target. If you are trying to generate e-commerce product photography, there is likely a LoRA for that. If you want illustrated headers, there is a LoRA for that. Browse the library rather than trying to describe complex styles entirely through text. Let the LoRA carry the aesthetic specification; let the prompt handle the specific changes.
For certain image enhancement or supplementary visual tasks adjacent to your main workflow, insMind is another tool in the Pollo AI ecosystem that may be worth exploring for all-in-one creative tasks.
How Free Access Helps You Validate Before You Commit
One of the most sensible things about the image-to-image workflow for non-designers is that you can verify whether it actually works for your use case before spending anything. The free option lets you try image transformation without committing to a paid plan.
This is useful in a specific way: it lets you run a real test on your actual images with your actual prompts, rather than making a decision based on sample images from a landing page. Those sample images are always the best-case scenario. Your use case will have its own quirks — the particular product, the specific background you are trying to change, the style you are trying to achieve.
The right workflow for a non-designer is:
- Take one of your real images that needs updating
- Write a prompt using the template above
- Generate and see how close it lands
- Adjust the prompt based on what the output shows you
- Iterate two or three times until you have something usable
Most non-designers find that the first few tries teach them more about prompt writing than any tutorial would. The feedback loop is immediate, and the output shows you exactly where your prompt was under-specified or ambiguous in ways that verbal explanations never quite capture.
The learning curve is real but it is measured in minutes, not days. And the output, once you land on a prompt structure that works for your type of images, becomes repeatable. That is what makes the investment worthwhile: not just the image you generate today, but the process you can reuse the next time you need a visual update without waiting on a designer.
Sethuram Kishore is the founder and editor of Worthview, an online publication established in 2008. With over 18 years of experience in SEO, digital marketing, and online publishing, he writes about AI, technology, business, and digital trends. He is also the founder of MoneyHulk, a personal finance and business publication.